Techivity

Inspire – Design – Create

Browsing Posts published by vjcoop

A “how-to” post about installing Google Analytics in WordPress.  Soon we’ll cover some strategy, traffic building and why web analytics are important, plus information on what to read in Google Analytics.

This post will describe how to set up my current favorite Google Analytics plug-in for WordPress.  I’ll be doing a Joomla plug-in soon, for those of you that use Joomla.

I personally prefer Google Analytics because they are free, relatively easy to set-up and provide more information than most need anyway.  The interface isn’t the easiest to read, but I think the fact that they are free, and provide the info needed makes up for that.  Plus, Google Analytics are ubiquitous on the web, so there are a lot of plug-ins that support them.  Just about everybody has Analytics these days, including Godaddy, Yahoo, etc…frankly so far I haven’t seen anyone giving away what Google gives away.

There are two ways to get Google Analytics into your WordPress blog; you can link the source code into the template, or you can install a plug-in.  Both methods have pros and cons.  I’d like to suggest the plug-in because if you change your template, the analytics will remain without coding.  If you like to run WordPress without many plug-ins then you’ll want to put the code in the template.

First, you need a Google Analytics account.  Go to analytics.google.com and sign up using your Google Login.  If you don’t have a Google Login, get one.  You can invite other Google Accounts to get into analytics to share information, so set up analytics in your account first and then invite them.

The piece of information you need is the tracking ID: UA-XXXXXXXX-X which you will pull out of the block of code Google gives you as you set up the analytics account.

My favorite WordPress plugin for Google Analytics at the moment is Google Analyticator by Ronald Heft because it adds a widget to the dashboard of WordPress with some basic analytics data, it works, and its pretty easy to setup.

To install that plugin, just go to “Plugins” in the WordPress dashboard, pick “Add New”, search on “Google Analyticator” and click “Install” on the right side.

Once its installed, click on “Activate this plugin” to activate it.  After the page reloads, click on “Settings” on the left-hand side to open the Settings menu and click on “Google Analytics” to enter your specific setup information.

There are two settings you have to change to get analytics tracking your site.

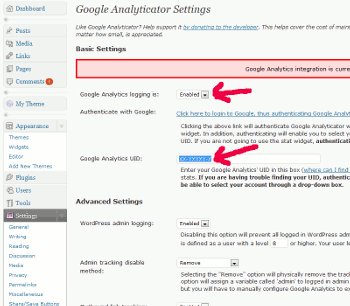
Image of Google Analytics in WordPress

Enable and Enter Your Tracking ID

First, you have to enable the plug-in on the drop down menu at the top.

Second, you have to enter your tracking ID, that number that goes UA-XXXXXXXX-X which you get from the Google Analytics code block (which you will see setting up a new analytics account), right after the part that says “getTracker”:

<script type=”text/javascript”>
var gaJsHost = ((“https:” == document.location.protocol) ? “https://ssl.” : “http://www.”);
document.write(unescape(“%3Cscript src='” + gaJsHost + “google-analytics.com/ga.js’ type=’text/javascript’%3E%3C/script%3E”));
</script>
<script type=”text/javascript”>
try {
var pageTracker = _gat._getTracker(“UA-XXXXXXXX-X“);
pageTracker._trackPageview();
} catch(err) {}</script>

After you’ve entered your Tracking ID and enabled the plugin scroll down and click on update.  (And by the way, if you’re embedding the code into your Template instead, that’s the code.  It should go in the Footer.php file, or at the bottom of Index.php, right above the </body> tag.)

Now, if you want your WordPress dashboard to display your analytics information, you have to also authenticate the plug-in with Google, so that it can pull the data.  Just click on the Authenticate this plugin link right under where you enabled the plug-in and log into Google.  If you’re doing this for a client, make sure and use THEIR Google account so that only their analytics accounts show up, if you have multiple ones, they’ll be visible in WordPress.

Its nice to have that little bit of analytics data right in the WordPress control panel.

So that’s it, if you got all these steps, then within 24 hours you will start seeing analytics data in your Google Analytics account!
http://ronaldheft.com/code/analyticator/

This is an incredibly long blog post that shows how to link a Facebook Page to Twitter, and a WordPress Blog to a Facebook Page so that when you update your blog, it automatically updates your Facebook Page and your Twitter account.

I had to do something similar for a client and decided it was cool enough to want to do a blog post about how to do this.

This took a lot of experimenting to because there are so many different WordPress plugins and options to connect WordPress to Facebook or Twitter.  Honestly, I think this is probably the easiest way.  Here are the requirements that I followed:

  1. Easy to learn and use, neither I nor my clients have lots of time to invest.
  2. Automatically update a Facebook Page and Twitter from WordPress
  3. Not update my personal Facebook profile, just my Facebook Page.

Seems simple enough, right?  It wasn’t.  I think because of the number of plugins and options available.

So, here’s what I did, with what I hope are fairly simple screenshots and steps to help those of you along inclined to do this.  Of course, if you want some professional help, feel free to contact or call me (801-274-8490 is the office line ;-).

These instructions are for linking a Facebook Page to Twitter, and then a blog to your Facebook Page.  They are more oriented for a small business owner than for a personal blog.  If you don’t have a Facebook Page, and you want one, check out the post on creating a Facebook Page.

First, get your Facebook Page talking to Twitter

This was pretty easy.  There’s a Twitter application that Facebook put together to link a Facebook Page to Twitter.  It does not work to link a personal profile (you have to add it to a Facebook Page).

So first, log into Facebook and open your Facebook Page (note that if you want your personal profile to talk to Twitter, you can add this application to your personal profile.  These steps add it to your page.)

Log in to Facebook.

Make sure you have, or create a Facebook Page

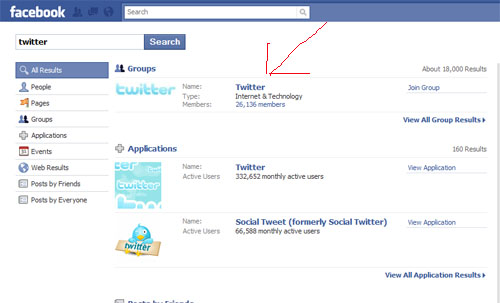
In the search bar up top, enter “Twitter”

The first link that comes up should be an application, click on it

Search for "Twitter" on Facebook
Select the Twitter App

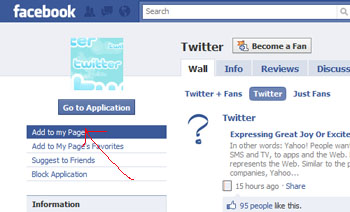
Selecting the Twitter Facebook App will open the Twitter application page and you’ll have to select on the left side to add the app to your page.

Click “Add to my page”

A web pop-up will open showing a list of pages in your Facebook account.  Click “Add to Page” for each page you want to send its wall updates to Twitter.

Now you will need to navigate back to your Facebook Page and click on “Edit Page” in the upper left.

Under the “Applications” area if you scroll down, you should see the Twitter Application, click “Edit” under the application and if you get the page asking to Allow the application, click the Allow button.

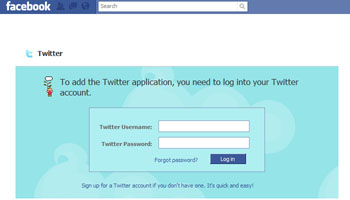
This will open up a Twitter login screen within Facebook (if everything has gone well so far):

Log in to Twitter within Facebook

At this point you will have to allow the Connection in Twitter. You still need to allow your page into Twitter.

Click on the Facebook App in Twitter Connections

Once you are logged in to Twitter, click on “Settings” and then “Connections.”

On the connections page, click on the Facebook app.

The next page will show a Facebook logo with an arrow pointing to Twitter and a large green button that says “Link a Page to Twitter”

Click on the large green button.

Again, a list of your Facebook Pages appears, with the pages on the left and a button “Link to Twitter” on the right.

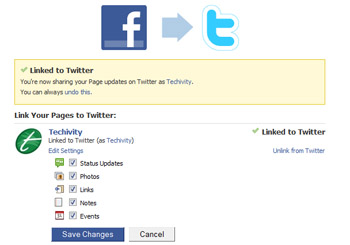
Click the “Link to Twitter” button for your page, which will open the options panel for the Twitter Facebook Application

Select the updates you want and click "Save Changes"

Ok — Finally, you should be all set.  Again, if this was confusing, and you want some help, don’t hesitate to contact me.

If you want to double-check, you can go into Twitter, click on “Settings” and then click on “Connections.”  If you see a Facebook connection notice there, with a “remove access” option, you’ve done it.

Connect WordPress to your Facebook Page with Networked Blogs

Now that we’ve finally got your Facebook Page updating Twitter, now we can connect your WordPress Blog to your FaceBook Page, for this we are going to use the Networked Blogs Facebook App.

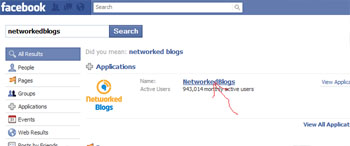
Again, go to your Facebook account and log in (or stay logged in) and in the search bar type “Networked Blogs” – the first one in the list, where it says “Applications” is what you want.

Click on the Networked Blogs application

That should open the application page, and on the left, you should see a link that says “Add to my Page” click on that link to open a web pop-up with a list of your pages.  Click “Add to Page” for the page you want to link to WordPress.

Now, go back to your page (click on the word “Facebook” in the upper left to go back to your home page and click “Ads and Pages” again), and click “Edit Page” on the left.

Scroll down and look at the list of Applications.  Networked Blogs should be on the list.

In this case, you have to allow your blog permission to post to the wall, so click on “Application Settings” and open the “Additional Settings” tab and check the box that says “Publish recent activity to my wall.” and click “Ok”.

Now we’re going to add your blog to Networked Blogs.  Click “Edit” under the NetworkedBlogs Application.  If you are following along with these instructions, this is probably the first time that you are running this, so you’ll have to Allow it access; if you get a page that starts with “Allow Access” click the button that says “Allow.”

This should open the networked blogs setup page.

Click Add Your Blog to networked blogs.

You will get a form to fill in with information about your WordPress Blog.  Fill out the information and click “Next”  – if you get an offer to check out a promotional widget, you can (and should) uncheck that box and click the next button.

NetworkedBlogs will ask if you are the author of the blog.  Click “Yes” (assuming you are), now you have to go through a verification step.

Choose to verify using the widget, open another browser window, log in to your WordPress blog and open “Appearance” and “Widgets”.  Put a text widget on one of your side panels.

Switch back to the networked blogs interface and from the “Copy the following HTML code” box, select everything, copy it, switch back to your blog and paste all that code into your text widget.  Save the widget.

Switch on back to the Networked Blogs interface and click “Verify Widget” – if you copied the code correctly, you should see a green box indicating you are verified.  Click that “Next” button to show the NetworkedBlogs configuration page.

We are ALMOST done here.  ALMOST.  This has been an incredibly long blog post, hasn’t it?  In the future I think we’ll choose smaller topics 😉

So here is the NetworkedBlogs page once you have it installed into your Facebook Account, and you’ve got a blog set up properly:

Networked Blogs Interface

Ok, now you want to click on the right side where it says “Feed Settings” – this is the final step to syncing your blog with Facebook, and thus, with Twitter.

Once you click on “Feed Settings” you will see an interface listing all your Facebook Pages – pick everywhere you want your blog to publish its updates.

Pick the places you want to update.

After you pick the options you want, Networked Blogs can publish a test post for you.  Go for it, you’ve worked hard, publish that test post.

If it doesn’t show up, step back through and check all the settings.  Feel free to post a comment here with questions or to contact me for some professional help.

This seems like it should be easy, and in fact, it is easy, but there’s few step-by-step instructions to create a Facebook Page out there.  Par for the course for the web and technical industry, most of the Creating a Facebook Page Instructions skip steps or make assumptions that make them hard to follow for those of us who are learning as we go.  I’m going to try and provide some solid, simple step-by-step instructions for creating a Facebook Page for your business or anything else really.

First, Log into your Facebook account

Here is the first rub…if you already HAVE a Facebook Page, or are linked to one as an editor, you have a simple little link on the left side saying “Ads and Pages” – so to get to the page interface click on that…a lot of reference material says to click that link.

BUT, if you don’t have that link, scroll to the very bottom of your profile page and click “advertising”, this will open Facebook’s Ads and Pages location…and its just not that intuitive to click “advertising” when you want “pages.”

Click on "Advertising" Image

Click on "Advertising"

So, anyway, once you are in the “Advertising” interface, it will open up showing information about advertising on Facebook.  Click on “Pages” up above all the ad information (or if you want to create an advertisement, stay there, click the green button and wander around until you are happy and run the ad, this post is about Facebook pages).

Click on “Pages”

Once you are in the pages interface, click on the large green button that says “Create a Page” – which will open up the first step to page creation.

You are on your way to having a Facebook Page that describes your business, product or other thing…in fact, now you have to choose how to categorize your page:

Pick the category for your Facebook Page

Make sure you name the page something appropriately descriptive and useful.  Of course, if you’re interested in Search Engine Optimization, Key Phrases and that kind of stuff, it would help to have some key words identified as you do this, but that’s a topic for another post.

When you click “Create Page” you will have created your Facebook Page and can start filling in the details.

You have the option of making your new page private while you work on filling in the details, until you’re happy with it.

Ok, so in future posts, we’ll talk about connecting Facebook Pages to Twitter and WordPress.

Ok, so we’ve got a client who is linking his Facebook Profile, Facebook Page and Twitter updates together.

There are an INCREDIBLE number of resources for doing this.  Right now, we’re testing the updates we set up using NetworkedBlogs and Facebook’s Twitter App.  If all goes well, our next post will tell everyone how to replicate what we’ve done.

Ok, so here at Techivity for the new 2010 year, we are launching a new site that will not only showcase our work, but will also share what we learn and know about conducting small business on the web.

Its our plan to share information about:

– Frameworks, such as WordPress, Joomla, Drupal, ModX and more

– Hosting services, such as xmission.com, bluehost.com and squarespace.com

– eCommerce options, such as VirtueMart, ZenCart, or hosted options like Volusion

– Search Engine Optimization, dispelling some of the myths about SEO, white hat, black hat, keyword research and so forth

– Social networking, like how to use Facebook, Twitter, YouTube and more

The web has grown to be an incredible resource both for personal connectivity and business development, but its huge, confusing and has its own language and subculture.  Even those of us who are “plugged in” all the time don’t have exposure to everything, everywhere, there’s just too much.

So, this blog is going to be our journey at Techivity through our various client projects, the resources we find and set up for our clients, and how to review those resources.  We hope to use every day language and talk about technical options with a firm grounding in business strategy and practice.